

This section provides a step-by-step tutorial for creating a simple GIF animation using GIFmation(tm) 2.1. You will walk through the steps required to create the GIFmation(tm) 2.1 button animation. Note that these steps are designed as a learning exercise to explore various aspects and capabilities of GIFmation(tm) 2.1.
1: Collect the Images for your Animation
GIFmation(tm) 2.1 cannot be used for creating original image contents for animation. A later version may provide this capability, but for now it is necessary to use another application to first create the images that will compose your GIF animation. (Adobe Photoshop 3.0.5 was used to create the five images for this tutorial.)
The images used are below, in the order of their use in the tutorial animation. You should use your browser to save these images to a convenient directory on your local hard drive before continuing with the steps in this tutorial.
![]()
![]()
![]()
![]()
![]()
2: Launch the GIFmation(tm) 2.1 application
If you do not have GIFmation(tm) 2.1 running at this time you should launch the application before continuing with the steps in this tutorial. Open the GIFmation application folder and double click on the application icon.
3: Create a New, Empty Document
In GIFmation(tm) 2.1, preference settings can be made so that the application will automatically create a new document when it is launched. If a new document was created when you launched the application, and you have not disposed of that new, empty document then no specific action needs to be taken for this step in the tutorial.
If no new, empty document is open in GIFmation(tm) 2.1, then you need to create one with the 'New' menu command under the 'File' menu. (File -> New) You can also use a keyboard command key combination (command-N) to create a new document.
After a new, empty document has been created, the application windows should look something like below, though you may have fewer or more floating palettes visible.
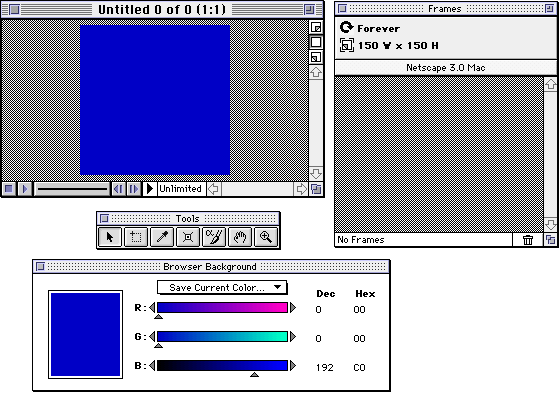
The document window is the upper-left one and is titled 'Untitled 0 of 0 (1:1)'. The name of the window contains the name of the document 'Untitled', the number of the currently visible frame and the number of total frames in the document '0 of 0', and the magnification ratio of the document view, '(1:1)'.
Notice the blue ares in the empty document window above. That is the logical screen size of the document, and the blue color is the currently set background color for the animation. When new documents are created, they are by default given a logical screen size of 150 pixels by 150 pixels and the browser background color defined in the application preferences.
4: Set the Browser Background Color
The next step is to set the browser background color for your animation. It is important to set this color to the actual browser background color that your animation will appear against when possible. If the browser background color is not known or the animation will appear on multiple pages with different background colors, it is best to use the standard Netscape gray for your animation's browser background color (198,198,198 or #C6C6C6). In that case, you need to pay particular care to the edges of your transparency later on, so as to avoid unwanted halo effects around your transparent images.
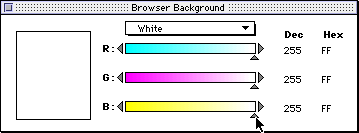
To set the browser background color, use the RGB sliders in the Browser Background Floating Palette to set an arbitrary color. Note, as you move the sliders you will see the color swatch in the palette change and any visible background color in the document window will also change as you adjust the RGB sliders in the Browser Background Floating Palette. You can set the color visually, according to the appearance of the browser background color in the swatch and document window, or precisely to known numeric values. The numeric value of each component of the RGB color is shown in both decimal and hexadecimal values to the right of each slider.
You can also set the browser background color using the color pop-up menu in the Browser Background Floating Palette, as it has been in this step of the tutorial to the color 'White'. To do this click on the color pop-up menu and then select the color that is desired (White).
5: Add the First Frame to Your Animation
In this step of the tutorial you will import the first image into your animation as a GIF. There is a special case in GIFmation(tm) 2.1 for importing GIF images that works a little differently than the general image import, which can also be used to import existing GIF images.
Select 'GIF' from the 'Import >' sub-menu under the 'File' menu. (File -> Import -> GIF).
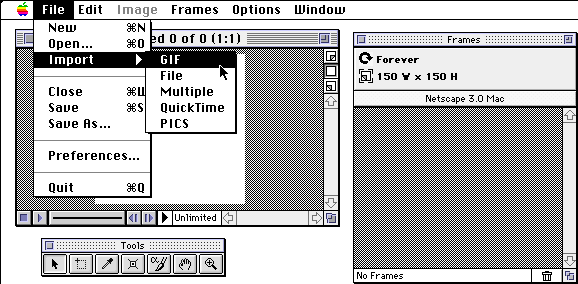
After you select the 'GIF' menu item, a standard dialog will be shown to locate the file you wish to import. In this dialog you need to locate the first frame of the animation 'gmbutton_cell_1.gif'. Note, if you do not yet have the five images used in this tutorial on your local drive, you can use your browser to save them to your local hard disk from step one of this tutorial.
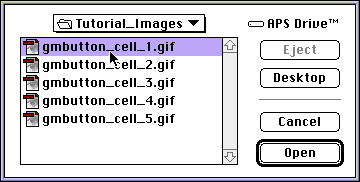
Select the 'gmbutton_cell_1.gif' file and click the 'Open' (which signifies 'Import') button in the dialog.
You have just asked GIFmation(tm) 2.1 to import a single image GIF file that uses a global palette. Each GIF file (i.e. a GIF animation) may only have one global palette that is common to all images in the file, though it may have many local palettes that are specific to individual images. Because the file you have just selected to import uses a global palette, and two global palettes cannot be used in your animation, some adjustment has to be made to the palette of that file as it is imported.
The 'Resolve Global Palettes' dialog will be shown in this case to allow you control over what will be done by GIFmation(tm) 2.1 to resolve the conflicting global palettes of the GIF image being imported and the global palette of your working GIF animation document.
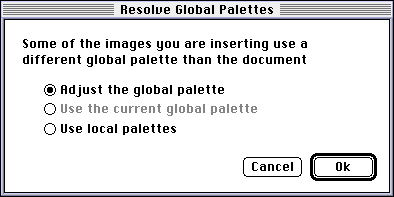
There are three options in the 'Resolve Global Palettes' dialog.
For this step of the tutorial, you should select Adjust the global palette in the 'Resolve Global Palettes' dialog and click OK to complete the import process. You should see something like the following picture once the file is imported. Note, that if not all of the floating palettes shown in the picture below are visible on your screen, you can use the commands in the 'Windows' menu to show and hide floating palettes. You should have both the 'Frames Floating Palette' and the 'Palettes Floating Palette' visible at this point in the tutorial.
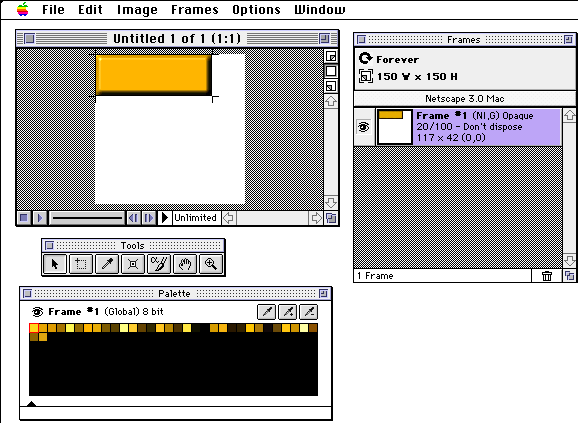
Look at the 'Palettes Floating Palette'. Notice that it is an 8-bit (256 colors) palette, even though only 35 colors are used so far by the image that was just imported. When GIFmation(tm) 2.1 performs super palette operations, as were performed when the initial image was imported, it always creates an 8-bit global palette, which grows until full, as images are factored into it. This greatly improves attainable image quality, without noticeable file size difference.
6: Adjust the Logical Screen Size of Your Animation
When a new document is created in GIFmation(tm) 2.1, it is automatically given a default logical screen size. You will need to adjust the logical screen size to the correct or desired size for your animation. The logical screen size can be adjusted at any time, but it is often easiest to go ahead and set the logical screen size soon after you begin a new animation.
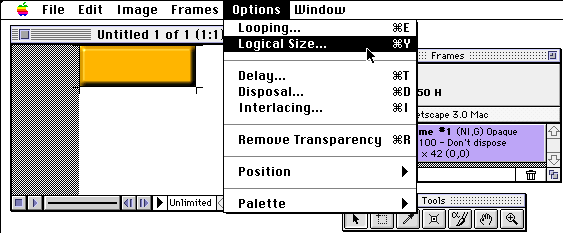
From the 'Options' menu in GIFmation(tm) 2.1, select the 'Logical size...' menu item. (Options ->Logical size..). You can also access the menu command with a command key combination, Command-Y, from the keyboard and as you become accustomed to using GIFmation(tm) 2.1 will find it much faster to use command keys to access most things.
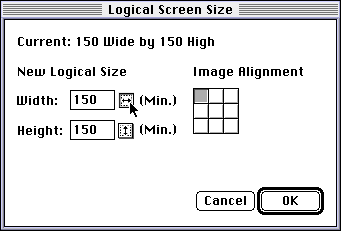
The 'Logical Screen Size' dialog (shown above) allows you to adjust the logical screen size - the area reserved to render all images in the animation - of your animation. It can be any size large enough to accommodate the size and placement of images in your animation, so that no portion of any image falls outside of the logical screen size. You can have an animation with no image larger than 10 by 10 pixels and a logical screen size of 100 by one 100 pixels if you desire, but you could not have a 100 by 100 pixels image in your animation and a logical screen size any smaller than 100 by 100 pixels.
In this step of the tutorial you need to set the logical screen size for your animation to the smallest size possible - the same size as the images that will be used in the animation. To do that, click the Min buttons for both width and height in the Logical screen size dialog and hit OK.
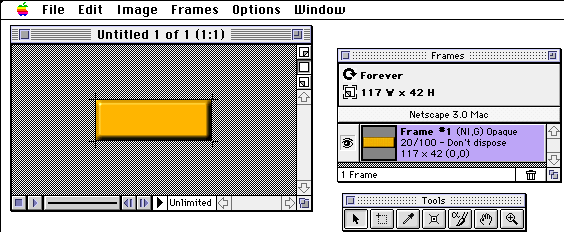
After you have changed the logical screen size, the document window for your animation should look like the above picture. Note that in the Frames Floating Palette, the icon for the image has also changed to show the change in the logical screen size of your animation.
7: Add the Last Four Frames to Your Animation
When you added the first image to your animation, you used the special case GIF import method (File -> Import -> GIF) which is only one of several means of adding images or frames to your animation. In this step a second method, batch importing (File -> Import -> Multiple), will be used. The same file types that are supported for image importing (File -> Import -> Image) are supported for batch importing. These are GIF, JPEG, PICT, TIFF, ScitexCT, Photoshop, and PhotoCD image formats. Note that in the Photoshop format CMYK and LAB images are not supported at this time.
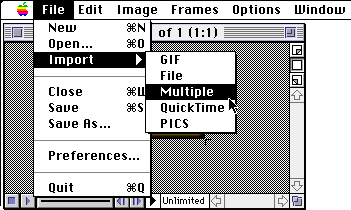
Select 'Multiple' from the 'Import' sub-menu in the 'File' menu to access the multiple get file dialog where you will select the files to be imported into your animation.
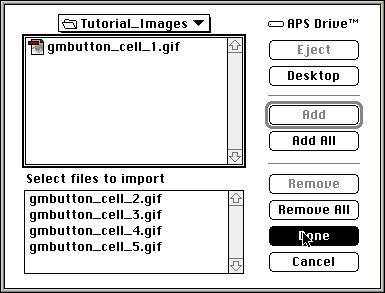
In the multiple get file dialog you need to locate the folder containing the images for this tutorial and add the files as shown in the above picture. The files that should be added are 'gmbutton_cell_2.gif', 'gmbutton_cell_3.gif', 'gmbutton_cell_4.gif', and 'gmbutton_cell_5.gif'. Files are added to your animation in the order that they are added to the file list in the multiple get file dialog. (NOTE: In alpha versions 1 - 4, files appear in the list in the order they are added, but are added to your animation in alphabetical order, which is not the intended behavior and will be corrected.) When you have added the four files in the correct order hit OK.
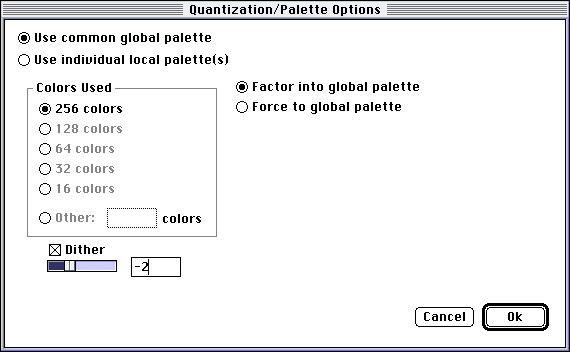
When using the general image import functions (File -> Import -> Image and File -> Import -> Multiple) the 'Quantization/Palette Options' dialog is always shown. These import functions must deal with both indexed color image formats and true color image formats, so versatility and control over color reduction and palette usage is needed. This is provided by the 'Quantization/Palette Options' dialog.
The appearance of this dialog will be significantly different depending on whether 'Use common global palette' or 'Use individual local palette(s)' is selected in the top-left radio button group. In this tutorial, the animation being created uses a global palette, and for general reference you should use global palettes for your animations in almost all cases. Use of local palettes should be left for the advanced user that is fully aware of the many browser variables that can arise when local palettes are used in a GIF animation.
In the 'Quantization/Palette Options' dialog you need to set the options as shown above. There are four pertinent ones: 'Use common global palette', which means that frames imported will use the common global color table of your animation document; 'Factor into global palette', which means the global palette present in your animation will be adjusted on the fly to create a true custom super palette that is optimized to display all the images in your animation; 'Dither', which when checked means that dithering will be used to improve visual image quality; '-2' on the dither intensity slider, which sets the amount of dithering to use. The range of the variable intensity dithering is -5 to 5 and a good general setting to use is -2, which provides good image quality without unduly increasing image size.
When you are done making the settings in the 'Quantization/Palette Options' dialog as above, click OK to continue.
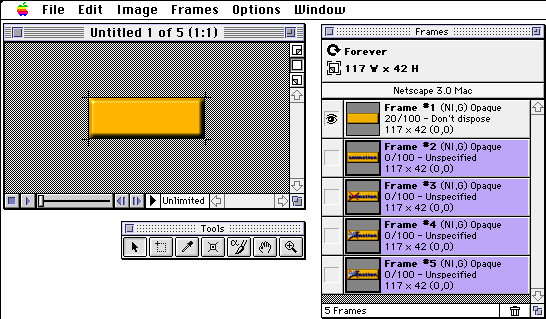
It will take a moment for GIFmation(tm) 2.1 to perform the required color reduction and palette operations, but after progress completes, your Frames Floating Palette will look as above.
Note that when images are added to GIFmation(tm) 2.1, they will be selected and highlighted immediately after import. Frames must be selected in the Frames Floating Palette before any of their local frame options can be changed, or their order changed, etc.
The disposal method of a frame tells the viewing application just what to do after that frame has been displayed for the appropriate amount of time. There are four possible disposal methods that can be used and a fifth user input flag that can also be set.
Disposal methods:
You should also review 'Aspects of GIF animation' for further explanation of disposal methods and other parameters that can be set in your GIF animation, as well as an overview of the current level of support for GIF animation options in popular browsers.
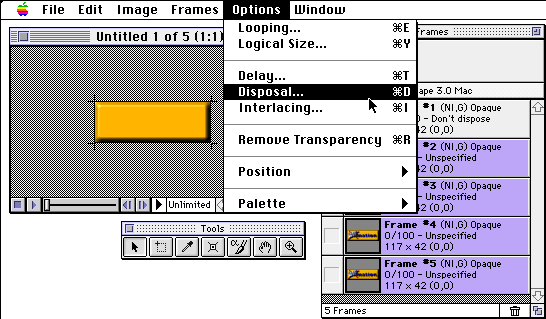
To set the disposal method for the four images you just added to your animation document, select 'Disposal...' from the 'Options' menu (Options -> Disposal...). You can also access the disposal method dialog with a command key combination, Command-D, from the keyboard.
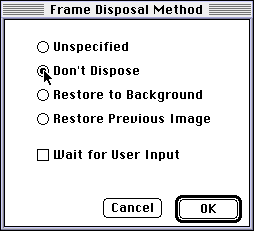
In the Frame Disposal Method' dialog, select the 'Don't Dispose' radio button and hit OK to set the disposal method of the last four frames of your animation document to the same as the first frame. Note, the 'Don't Dispose' disposal method is the only one that is universally supported by all browsers supporting GIF animation presently.

The changed disposal method will be shown in the Frames Floating Palette for the selected images, and all the frames should have the same disposal method of 'Don't Dispose' set now.
While the last four frames in your animation document are still selected, you also need to set their delay time to match the delay time already set for the first frame of your animation, 20/100ths of a second. If you do not set a delay time for frames (leave it set to zero delay) your animations will play much too quickly for most people once they have finished downloading and are playing from the viewers local disk cache.
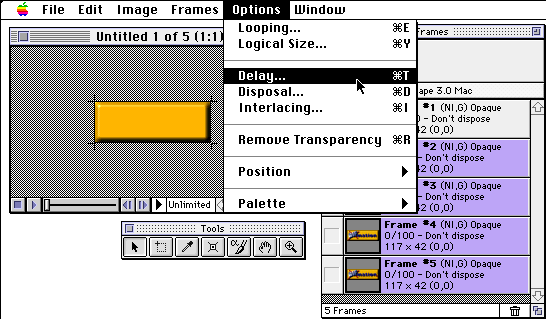
Select 'Delay...' from the 'Options' menu (Options -> Delay...) to access the delay time dialog. You can also access the delay time dialog with a command key combination, Command-T.
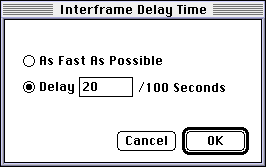
In the 'Interframe Delay Time' dialog, select the 'Delay' radio button and enter '20' in the corresponding text edit box. This will set the delay time for all selected frames in GIFmation(tm) 2.1 to 20/100ths of a second. Using the 'As fast As Possible' option would set the delay time to zero.
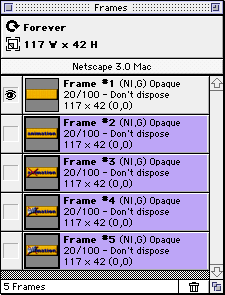
The changed delay time will be shown in the Frames Floating Palette for the selected images, and all the frames should have the same delay time of 20/100ths of a second set now.
During the steps in this tutorial, not all possible frame options and animation options were specifically set, because many options were set from defaults with no need to change them. Now we take a close look at all of the settings in the animation, so you can understand them.
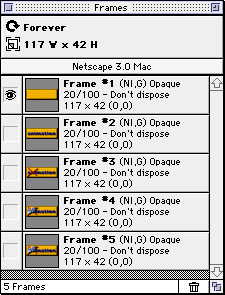
All pertinent information about your animation is displayed in the Frames Floating palette. The global animation settings for the logical screen size and looping are displayed at the top of the Frames Floating Palette. During this tutorial, you specifically set the logical screen size for the animation but not looping. The default setting for looping was 'Forever', which is what was wanted for the animation being created. Should it have needed to be something else, such as no looping or looping x number of times it would need to be specifically set.
All the frames are set to be non-interlaced, as indicated by the 'NI' in the top line of the frame information to the left of each image icon. This is almost always the desired interlacing setting for frames in GIF animations, because strange visual effects can occur when animations containing interlaced images are used.
All the frames in the animation also use a common global palette that was created as a custom super palette by GIFmation(tm) 2.1, as you imported the images into your animation document. The global palette usage is shown by the 'G' next to the 'NI' showing the frame is non-interlaced.
All the frames in the animation are opaque with no transparency set. This is a simple animation that used a series of full frame images, so no transparency is needed in this case. Transparency is commonly used in more advanced animations, though, and when needed would have to be set for each frame using the eye dropper tool or the transparency controls in the Palette Floating Palette in GIFmation(tm) 2.1.
All the frames in the animation have a delay time of 20/100ths of a second, which was set specifically during the tutorial steps. This is a fairly quick delay time, just slow enough to keep the animation from playing painfully fast on fast computers.
All the frames have their disposal method set to 'Don't Dispose, which means each frame will be rendered over the last as the animation plays. When creating simple full frame animation, the 'Don't Dispose' disposal method works best, and it is also the only disposal method that provides consistent behavior in all browsers currently supporting GIF animation.
All of the frames in the animation are 117 pixels wide by 42 pixels tall as shown on the bottom line of the frame information. This is the same dimension as the logical screen size for this animation, but images in a GIF animation can be any size that is smaller than the animation's logical screen size.
The positioning offset of all images in this animation is 0,0 as shown at the right of the last line of the frame information. Anytime a full frame (one that is the same size as the logical screen size of your animation) image is used in an animation its offset will be 0,0. Should an image that is smaller than the logical screen size be used, the offset would show the horizontal offset, in pixels from the left edge of the logical screen as the first number, and the vertical offset, in pixels down from the top edge of the logical screen as the second number.
In GIFmation(tm) 2.1 the document window also serves as the preview and controls, similar to those found on more or less standard QuickTime Movie players with some additions, are provided to control previewing your animations. When previewing animations in GIFmation(tm) 2.1, you should be aware that GIFmation(tm) 2.1 has more complete support for GIF animation than all browsers that currently have some level of GIF animation support. All settings made in GIFmation(tm) 2.1 will behave exactly as expected when an animation is previewed in GIFmation(tm) 2.1, but that is not a guarantee that they will behave as expected in a particular browser.
You should pay careful attention to any settings chosen that cause the caution button to appear in the Frames Floating Palette. Those settings will be displayed in red because they are not completely compatible with the browser or browsers chosen for checking compatibility with. If you click on the caution button, GIFmation(tm) 2.1 will display a window with explanations of all flagged incompatible settings.
This tutorial animation has been made in such a way that it will display consistently in Netscape 3.0 and most other browsers supporting GIF animation as well, so with Netscape 3.0 Mac chosen for compatibility checking there are no cautions for any of the settings in this tutorial animation.
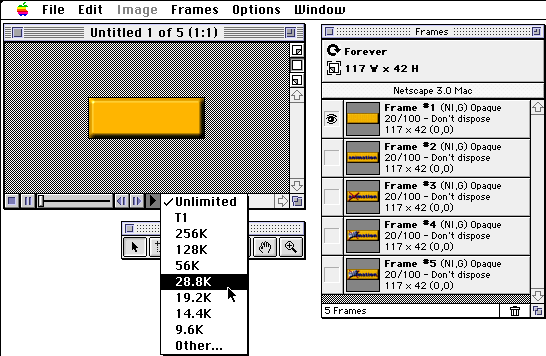
From the pop-up menu at the bottom of the document window, select the download speed at which to preview your animation. 28.8K is probably the most common modem speed in use presently and is a good rate at which to preview your animations, initially.
After you have set the preview speed, click Play/Pause button, which is the second button from the left along the bottom of the document window. This will begin to play your animation at the set preview speed. To pause the animation on the current frame, simply click the Play/Pause button once more, or to stop the animation and return it to the beginning frame, click the Stop button, which is the first button at the bottom-left of the document window.
Note that you can change almost all settings for frames while your animation is playing, so that different settings can be dynamically previewed. You can also use Undo while the animation is playing to revert any changes made.
Saving documents in GIFmation(tm) 2.1 is standard. Since you have not saved the document previously during this tutorial, you can either perform a simple Command-S 'Save', or 'Save As..'. Both will cause a standard put file dialog to appear so you can specify the name of the saved document and the location of the saved document on your hard drive.
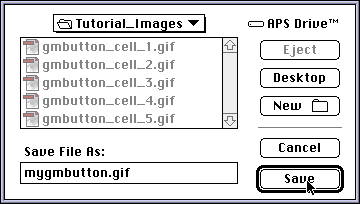
You should locate the Folder containing the original images for this tutorial and save the animation document as 'mygmbutton.gif'.
After saving your animation you need to optimize it. To do this select 'Export Optimized...' from the 'File' menu before closing your animation document. (File -> Export Optimized...). You will be asked to name the optimized animation document that will be created and select the location for the file. Name the file 'mygmbutton-op.gif'.
Note, it is important that you not use the 'Export Optimized...' command to save over existing animation documents that you may have the need to edit the images in at a latter time. The process of optimization destroys the editability of images contained in the animation, but animation settings such as frame delay times can still be safely changed after an animation has been optimized.
GIF animation is an inline animation format. Supporting browsers require no plug-ins to be installed and no special syntax for placing GIF animations in your HTML documents. The syntax used is the same as that used for single GIF and JPEG images, the IMG tag. Below is sample HTML for placing a GIF animation in an HTML document.
<IMG HEIGHT="42" WIDTH="117" SRC="mygmbutton-op.gif"
ALT="Sample GIF Animation">
Using a text editor such as Simple Text of BBEdit, you should copy and paste the above line of HTML syntax into a text document and save it as 'test.html' in the same folder with your saved GIF animation.
You should always test your finished animations in as many different browsers as you have available before publishing them online, to ensure that their behavior and appearance is acceptable and as you expect. You must keep in mind the limited amount of support for the full GIF specification in browsers at present and be aware that not all options, that GIFmation(tm) 2.1 supports and will allow you to set, are supported in kind in web browsers. The section 'Aspects of GIF animation' details the level of GIF animation support in current browsers. Reviewing that section will better enable you to create GIF animations that display consistently among most current browsers.
To view your animation locally in a browser use its Open...' command in the 'File' menu to open the 'test.html' document you previously saved.
Note that different browsers may vary in the steps needed to view files locally.
Copyright 1997 BoxTop Software, Inc. All rights reserved. GIFmation(tm) is a Trademark of BoxTop Software, Inc. All other Trademarks are recognized and the property of their respective owners.
Artwork produced using Snapz, Photoshop, PhotoGIF, and GIFmation. HTML produced using BBEdit Lite.